As Above, So Below is the eleventh chapter in Uncharted 3: Drake's Deception.
Plot[]
Nate and Elena argue over the former's motives and why he's doing this; she doesn't understand why he's putting everyone in danger and she soon admits that she is over the thrill of treasure hunting. She wants to move on. Sully soon comes back with the Sawed Off Shotguns, one for Elena and the other for himself, stopping their argument. Drake soon asks why he doesn't get one, with Sully replying "that he (the "rug" merchant) only had two available." Drake gets over this and the trio lift the cover off the hatch and jump down. From there, they discover a room with three pathways, but the middle pathway is blocked off, so they have to solve the puzzles in the other two rooms to open the main pathway. At the end of the pathway, they discover a celestial map which Sully uses to memorize the location of Iram. As he does this, the spiders from before show up and chase them out of the area.
After that, Elena questions Drake's motives and asks him why it can't be enough that he knows the location of Iram and Marlowe doesn't. Suddenly, Talbot's men ambush the three and after an intense firefight, the three make it back up to the street, abandoning their guns. Drake gets drugged with the same kind of dart used on Cutter and violently freaks out, fleeing the scene and leaving Sully and Elena behind. Drake follows Talbot's words through the streets during his hallucinations, until Drake finally wakes up at a table with Marlowe. The two have a conversation about Drake's past and his relationship with Sully, until Talbot informs Marlowe that his men have located Sully and that Drake is no longer needed to help them find him. As Talbot goes to find Sully, Drake flips the table and chases after Talbot, all the while, attracting the attention of the local police. After a long chase through the streets and rooftops, Talbot finally stands his ground and fights with Drake. Drake almost defeats Talbot, but is knocked unconscious at the last minute by Rameses, who was sneaking up behind him.
Walkthrough[]
I. Climb down the ladder that leads to the bottom of the well. You can collect Treasure #50 before you drop to the floor. You are greeted by a puzzle that you must complete in order to open the way forward. Press SELECT to take out Nate's journal, and he will retrieve a sketch showing three pillars. Once he has this to hand, press L1 to hold the illustration aloft, enabling you to compare it with the scene you can see in the room. There is no point of reference on the map, so you will need to explore the room to find an additional clue before you can match the sketch with a view from a specific vantage point.
Temple Entrance Puzzle Solution[]
With so many pillars in the room, finding the position that corresponds to the illustration could be time-consuming...until you find the Enochian script on the wall. Once Nate has translated it, he marks a moon symbol onto the bottom of the map. There are floor tiles on the outer edge of the chamber; one of these is marked with a similar symbol. Stand on it, then turn and line up the map picture to find the correct switches. Sully and Elena will move to reach inside the holes furthest away on the drawing. Move Nate to the closest hole marked with an X, then press triangle to open the door.
II. Follow Sully and Elena along the corridor (note how the heads on the statues in this corridor track you - this is an illusion created by inverting the geometry of a shape). Collect Treasure #51, then, once you reach a large chamber, run through either door. It is a good idea to start with the one on the left to reach the temple's west wing (and immediately collect Treasure #52). In this room you will find a capstan in front of five empty slots, with an assortment of different gears littered around the area. You can pick up (and drop) a gear by pressing triangle. Press square to place it in an empty slot after positioning Nate accordingly.
III. One essential gear is missing; to find it, you'll need to reach the upper section of the broken balcony. While you are up there, you will traverse across a long wooden beam. As you do so, study the wall-mounted moire patterns through the faint gaps in the wooden screen in front of you for a clue on which types of gear you need to use. The way in which they appear to be animated also offers an oblique hint on the specific slots they should be placed in. Once you have placed gears in each slot, turn the capstan wheel to attempt to solve the puzzle. Should the positioning or choice of gears be incorrect, the counterweights on either side will crash back down with a contemptuous thud.
West Wing Puzzle Solution[]
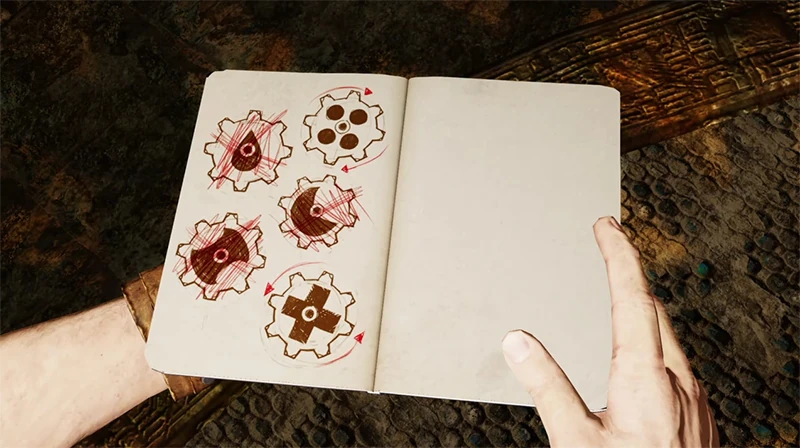
- Follow the path to reach a platform where an essential gear can be found, then press triangle to push it to the lower level.
- As the "animated" moire patterns reveal during the climb, you need to place the gears so that those bearing plus signs rotate in one direction, and those marked with circles rotate in the opposite direction.
- Should you rotate the capstan clockwise with each slot filled, you will notice that three gears move clockwise, while the other three move counterclockwise. All you have to do, therefore, is place the two plus-sign gears in the slots that rotate in the same direction as the fixed plus-sign gear, then fill the three remaining slots with the gears marked with circles.
- From left to right, the exact solution is: large cog (circles)>small cog (plus)>large cog (circles)>large cog (plus)>small cog (circles)>fixed small cog (plus).
IV. Return to the previous chamber, but this time go through the door to the right of the statues to reach the east wing. If you open Nate's journal, you will find an illustration of a warrior impaling his opponent with a spear. The far wall relief directly ahead as you enter the chamber features what appears to be the victim... but where is his killer? Well, run to the gold staff in the center of the room and press triangle to pick it up (which enables you to collect Treasure #53). To solve this puzzle, you need to find a position where a collection of body parts align to form a complete figure, which in some way interacts with the relief of the man on the wall opposite the entrance.
East Wing Puzzle Solution[]
Starting with Nate's back to the entrance, pick up the staff and move to the right-hand side of the room to stand beneath a disembodied head. From this position, hold L1 and look towards the wall relief. You should immediately see individual parts in approximate alignment to complete a full body, so fine tune your position and press triangle to place the staff in a floor slot.
V. After completing this puzzle, pick up Treasure #54 and return to the main chamber. Head through the central door, then follow the path to reach a ladder. At the top, press triangle to pick up the torch, then walk into the planetarium. Approach the globe in the center of the room and press triangle to continue.
VI. When play resumes, press square at regular intervals to sweep the torch and deter the swarming insects as you retrace your steps. You don't need to worry about Elena and Sully - they will look after themselves and follow you. When you reach the door raised by solving the earlier puzzles, press triangle to lift it. As the insects pour into the corridor, use shotgun blasts to repel them. Each round will cause them to retreat temporarily. Keep the main swarm in sight (even when it moves onto the walls or ceiling) and fire every time it approaches your position, wihout worrying about ammunition.
VII. As you arrive in the chamber at the bottom of the well, take cover behind a pillar when smoke grenades are dropped from above. The lack of visibility in the center of the room means that you must stalk around the outer edge, killing opponents as they emerge from the clouds. The shotgun that you start with has plenty of ammunition for this encounter, but collect a pistol as soon as one becomes available. Towards the end of the fight, stronger opponents (including two wearing body armor and a Brute) will enter the fray. Treat the armored foes with care, ideally staying in cover and weakening them with pistol shots - better still, headshots - before switching to the shotgun to finish them off with blindfire shells should they draw near. These opponents drop the SAS - 12: switch to this as soon as you can. If the room is relatively clear of other assailants, you can run away from the Brute and pepper him with more shotgun blasts as he gives chase.
VIII. When the smoke clears, identify and approach a damaged pillar, then press triangle for Sully to boost you to the ledge above. Leap backwards to grab the broken window at the bottom of the well, then climb the ladder to the top. Collect Treasures #55, #56 and #57 in the market area outside before you approach the steps at the far side of the square, which automatically triggers a cinematic interlude. When play resumes, stagger through the bazaar until the sequence ends with a white-out - you cannot go the wrong way.
In this short but exhilarating sequence, Nate must pursue Talbot in a perilous pursuit through city streets and alleyways, over rooftops, and weaving through a variety of business establishments and homes. An added complication is that Nate - always trailing behind his slightly more athletic quarry - is being hunted in turn by members of the local police force. Checkpoints are reasonable plentiful during this action sequence, and the route you must follow is, for the most part, self-evident. There are, however, numerous occasions where you must take a very specific route in order to evade capture or an unpleasant demise.
IX. The first part of the chase is simple enough: just wave through the pedestrians. Towards the end of the marketplace, vault over the taxi and climb the stairs, then jump up to the ledge beside the wooden boards.
X. When Nate is knocked back onto a table by a swinging door, veer to the right and take the stairs to follow Talbot.
XI. When Talbot kicks the ladder down, turn right and follow him from below. After the wooden bridge, leap over to the ledges directly ahead and climb up. Follow him over the metal awnings and a wooden platform, then leap to a drainpipe at the end.
XII. When a van hits Nate, run through the doors, jump onto the counter directly ahead, then climb to the upper level. Talbot will continue clambering to the next floor, but Nate must take an alternative route: dash through the doorway and up the staircase.
XIII. When Nate closes in on Nate upstairs, press triangle to perform a diving tackle when the prompt appears. After the crash landing, follow him in scaling the ledges to the left of the archway (and incoming police), then veer left to follow the street. When Talbot slams a gate shut, turn left and use the horizontal pole to swing to an open window.
XIV. After leaping from a balcony and crashing through a window, you will lose sight of Talbot as you follow him up a staircase. At the top of the final flight, take an immediate right to burst through the doorway. Outside, collect Treasure #58, then push through the crowds. When you reach the far balcony, follow the route to close the gap on your target.
XV. After Nate smashes through the roof, Talbot is visible for the rest of the chase. When you reach a wooden sign at the end of a metal awning, leap over to it, transition to the opposite side and move left onto a ledge; climb up, then run to the top of the building; jump to use the zipline. Get ready to press triangle on landing to evade a surprise attack.
XVI. Talbot, when finally cornered, proves to be an adept fighter. This bout of melee combat has much in common with your encounters involving Brutes. Concentrate on counterattacks to break your opponent's guard, then follow up with combination blows whenever an opportunity presents itself. When Talbot grapples with Nate, tap O rapidly to break his grasp. The final stage of the fracas sees Talbot attempting to drown Nate in the pool. Hammer O to escape, then be prepared to counter with triangle when he runs in for a final attack.